This post assumes that you have already installed opencv packages on your system. [If you haven't please check this post.]
Having installed packages next step is to set up Eclipse.
- Open Synaptic Package manager. In quick filter box type 'Eclipse'.
- Select 'eclipse' and 'eclipse-cdt' , select mark for installation and click apply.
- Open Eclipse. This will ask you to select workspace. Select the location where you plan to save your source code.
- Select Flie->New->C++ Project.

- Name project as tutProjectSetup. From project type select Empty Project. Click Finish.
- This will create a new project. From the Project Explorer window select this new project.
- From toolbar select project->properties.

- Expand C/C++ build from the right pane. In settings box click on the tab Tool Settings.
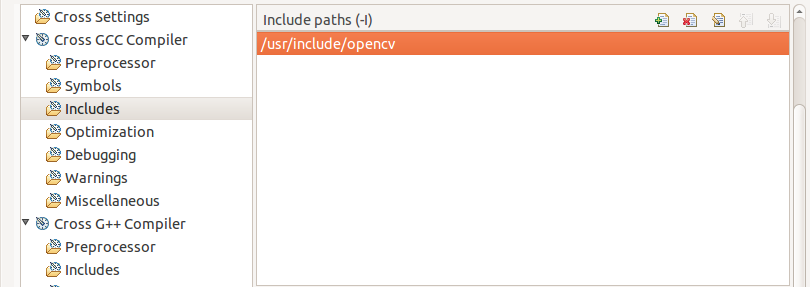
- Expand cross GCC Compiler select Includes. Type the include path for opencv here. To find out include path for your installation open terminal and type
$ pkg-config --cflags opencv
This will output include path. For example in my case output of pkg-config was -I/usr/include/opencv . Strip initial -I from the string and add this path to Include paths. In my case it is /usr/include/opencv .
- Select cross G++ Compiler and follow similar procedure mentioned in step 9.
- Now select Cross G++ linker->Libraries.
In library search path section enter the path of opencv libraries. You can find out this path by typing following command on terminal
$pkg-config --libs opencv
This will generate output path and a list of libraries available in opencv package.
Add this path in library search path. In my case this path is /usr/lib . In libraries section add following libraries. Adding first three of the list is usually sufficient.
opencv_core opencv_imgproc
opencv_highgui
opencv_ml opencv_video
opencv_features2d
opencv_calib3d
opencv_objdetect
opencv_contrib
opencv_legacy
opencv_flann
Click ok.
- Lets test the configuration of our project. Right Click on project and add->new->folder. Name this folder as src. Right click on this folder and add new source file. Name this file as testConfig.cpp .
- Add the code posted here to testConfig.cpp.
- Again right click on project and create new folder. This time name this folder as res. Select a small jpg image from your computer and paste this image in res folder. Rename newly added image as download.jpg.
- Right Click on tutProjectSetup and build. Again right click on project and select run as ->local c++ application.
- This will display your image in a new window.


No comments:
Post a Comment